Call us now
- Mon - Sat 7:00 - 16:30, Sunday - CLOSED
- sales@ezshowerrepairandtiling.com
-
-
Service Area
Brisbane / Gold Coast / Sunshine Coast/ Toowoomba
How to Regrout a Shower Like a Pro
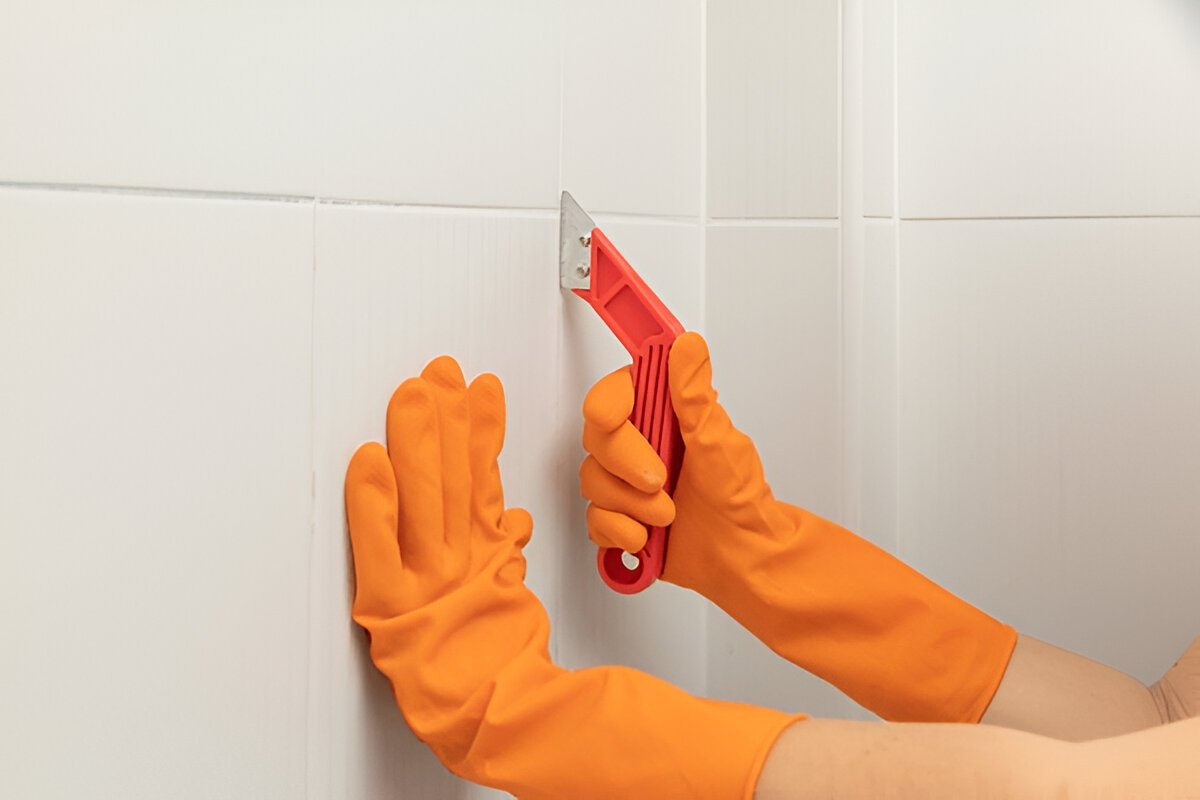
How to Regrout a Shower Like a Pro Is your shower looking worn, stained, or, worse, water-damaged? Don’t get into a costly remodel just yet. Often, the culprit is simply old, worn-out grout. We at EZ Shower Repair and Tiling Australia know the significance of a tidy shower. It not only adds to the aesthetics of your bathroom but also guards against water damage, which can lead to expensive replacements. As you read on, we will lead you through each step of how to regrout a shower like a professional. What Factors Make Tile Regrouting Necessary? It makes your tiles last longer. Regrouting improves the appearance of your bathroom. It prevents water-related damage and the growth of mould. The level of cleanliness and hygiene can be improved by regrouting. Saves money on costly tile replacements Understanding When Your Shower Requires Regrouting Grout creates a water-resistant seal that prevents moisture from leaking behind tiles and damaging the structural framework. This seal will eventually wear away, especially in Australian weather. The following are clear signals that your shower requires regrouting: Crumbling or broken grout between tiles Discoloration that persists Visible moulds or mildews Water leaks behind tiles or adjacent walls Loose tiles that slide when pushed Flaking or powdery grout surface Tools and Materials for Shower Regrouting If you want to proceed with “how to regrout shower tiles,” you will need the right tools and materials. Tools Grout removal tool (utility knife, electric grout removal tool, or hand grout saw) Rubber grout float Grout sponge and microfiber cloths Mixing bucket (for powdered grout) and stirring tool Measuring cup Safety gear (rubber gloves, glasses, and dust mask) Materials New grout (sanded cementitious grout for larger joints, typically 3 mm or more; unsanded cementitious grout for narrow grout lines, less than 3 mm; and epoxy grout for showers, resistant to mould, mildew, and stains) Grout sealer Painter’s tape A plastic sheet or drop cloths Clean water How Do You Regrout a Shower in 7 Steps? In this section, you will be guided step-by-step on how to regrout a shower to get professional results. 1: Preparation Take away all shower accessories, bottles, and curtains/doors if possible Cover showerheads, taps, and drains with tape or plastic to avoid damage Protect the shower floor using drop cloths, particularly if it is porcelain or some other material that might scratch easily Open windows or use fans to provide sufficient airflow during the process In Australia’s climate, moderate humidity should be 40-60% for best grout curing 2: Remove the Old Grout Position your grout remover at a 45-degree angle to the grout line Proceed systematically along each line, with consistent pressure Strip at least 2-3mm thickness of aged grout to offer adequate adhesion for the new application Give special attention to areas with noticeable damage or mould growth Vacuum clutter frequently to keep your work area visible 3: Clean the Grout Lines Vacuum out all remaining debris from the grout lines Wipe down the area with a moist sponge to remove dust If mould is present, apply an appropriate mould killer Clean tiny spaces with a little brush Clean the tiles with warm water and mild detergent before you re grout shower tiles Scrape the grout lines with an old toothbrush or a stiff brush Use clean water to rinse the tiles and remove any soap residue Leave the area to completely dry (24 hours is recommended) before adding new grout 4: Mix and Apply New Grout Always mix grout strictly according to the directions provided by the manufacturer Mix in small batches to prevent premature hardening Reach a peanut butter consistency—not too wet, not too hard Let the combined grout stand for 5-10 minutes (slaking) before the final stir Spread grout to a section that you can control (around 1 square metre) Place your rubber float at a 45-degree angle and use it to force grout firmly into joints Move diagonally across the tile joints to get complete filling Remove any excess grout from the tile surfaces as you work 5: Clean Excess Grout and Allow it to Dry Use a moist sponge in gentle circular motions to remove excess grout within 15-30 minutes (when it begins to set but does not harden) Wring and rinse your sponge regularly to prevent grout residue from spreading Be careful not to remove grout from between the joints After the first clean, use a microfiber to remove any remaining dust Allow the fresh grout to dry as directed on the container (usually 24-72 hours) 6: Seal the Grout Make sure grout is fully dry and cured Use a tiny brush, applicator, or spray to apply grout sealer Work carefully to cover all grout lines evenly Remove any extra sealer from tiles after 5-10 minutes Use a second coat if advised by the product instructions Wait for the sealer to completely dry (typically 24 to 48 hours) before taking a shower 7: Apply Silicone Caulk to Corners and Edges Apply painter’s tape to corners and edges on both sides Fill a caulking gun with the appropriate silicone caulk (a mould-resistant kind is recommended) Apply in a continuous, smooth bead Use a caulking tool or damp finger to smooth the bead right away Remove painter’s tape while the caulk is still wet Let the caulk completely cure before using it in the shower Common Regrouting Mistakes Use these recommendations to achieve professional shower regrouting results: Mistake Why It is a Problem How to Avoid it Not removing the old grout New grout won’t bond properly Remove at least 3–5mm of the old grout Using the wrong grout type for the tiles May lead to cracks and leaks Use waterproof, mould-resistant grout Skipping the application of grout sealer Grout absorbs moisture and stains Always seal after curing Completing the procedure in a hurry Poor finish and weak joints Allow sufficient drying and curing time Not fixing the damaged tiles Water can penetrate through tiles Repair or replace before regrouting The Benefits of Using

What NOT to Do With A Leaking Shower
What NOT to Do With a Leaking Shower That’s roughly the number of times you enter your shower every year. Shower leaks are among the most common defects found by building inspectors in Australia, which isn’t surprising given the level of water exposure. With over 116 hours of water use annually, effective maintenance and timely repairs are essential. But are you fixing it right? Before you grab that silicone gun or call the first repairman you find, let’s go over what not to do with a leaking shower to avoid common mistakes. Shower Leaks: The 6 Mistakes Costing You a Lot Some common errors that can lead to costly repairs are highlighted below. Read on to learn how to fix a leaking shower the right way. 1. Ignoring Early Warning Signs One of the biggest mistakes homeowners make is delaying action on a leaking shower. The Leaky Shower Timeline When shower leaks are neglected, water damage follows a predictable pattern: Weeks: Water penetrates small grout or sealant cracks, weakening waterproofing layers. Months: Structural components like timber frames begin to rot, and mould grows in damp areas. Year or More: Major upgrades may be needed, including floor repairs and even ceiling collapse. Signs of a Leaking Shower Watch out for these early signs: Mould or mildew in corners and grout lines Loose or broken tiles Peeling paint or wallpaper near the bathroom Persistent musty smells Water stains on nearby walls or flooring 2. Band-Aid Fixes: Why Quick Repairs Can Backfire When noticing a leak, many homeowners attempt quick fixes instead of addressing the root cause. The Silicone Solution Myth Applying silicone along tile joints or fixtures might slow the leak temporarily but won’t repair serious waterproofing issues. Improper use can trap moisture, causing further damage. Skim Coating: A Temporary Fix Applying a thin waterproofing layer over existing tiles (skim coating) may work in specific cases but often fails to address structural movement in your home, leading to recurring leaks. 3. Not Identifying the Real Source of Leaks Visible damage often appears far from the actual source of the leak. The Hidden Nature of Water Damage Water travels the easiest path, so stains or mould may be metres away from the source. Professional leak detection tools like pressure testing and thermal imaging can pinpoint the exact problem. Common Leak Sources Failed waterproofing membranes under tiles Weak grout lines Poorly sealed shower drains Cracks in shower bases or walls 4. Not Removing the Shower Screen This critical mistake is often made by homeowners or repair services looking to cut costs. Why Shower Screen Removal is Essential Shower screens hide key areas where leaks often occur. Penetrations around mounting points and lower edges are common sites of water entry. Proper inspection and repair require removing the screen to access and address these areas. 5. DIY Shower Repair: Good Idea or Bad Idea? While DIY projects can save money, they often lead to bigger problems if done incorrectly. When DIY Works Small issues like replacing showerheads or sealing external joints can be handled by homeowners. When to Call a Professional Water penetration into walls or floors Failed waterproofing Structural repairs Professionals ensure compliance with Australian building codes and use the right materials for long-lasting results. 6. Having Unrealistic Expectations Hoping for a quick, cheap fix can lead to disappointment and frequent repairs. The Reality of Shower Repairs Shower leaks left unaddressed for years often require complete rebuilds to fix hidden damage. While costly upfront, professional repairs with warranties save money in the long term. Final Thoughts: Fixing a Leaking Shower the Right Way To fix a leaking shower properly: Start with professional leak detection to identify the real source of water penetration. Take action early to avoid extensive and costly repairs. Regularly check grout lines and seals to prevent leaks before they escalate. When selecting a repair service, trust specialists like EZ Shower Repair and Tiling. They provide accurate leak detection, expert repairs, and workmanship warranties, ensuring a functional, waterproof bathroom for years to come.
How to Fix a Leaking Shower Floor
How to Fix a Leaking Shower Floor Have you ever experienced a leaking shower at some point in your life? Not only does a leaking shower floor cause disturbance, but if ignored, it can cause water damage, mould growth, and structural problems. In Australia, leaks must be fixed right away because bathrooms are at risk of moisture buildup. Read more of this blog to get a guideline with detailed instructions about how to seal a leaking shower floor. Let’s get started. What Factors are Causing Your Shower Floor to Leak? Shower floors in your bathroom direct water from the shower to the drain. Common causes that can lead to cracks and leaks are: Movement Earthquakes and severe vibrations from machinery can still shift a solid shower floor. Even if it does not crack, shifting it can leave gaps that allow water to pass through. This may happen if the grout crumbles or the floor was not properly slanted when it was installed. Waterproofing Leaks are frequently caused by waterproofing problems, such as wrong product selection, insufficient waterproofing, installation damage, or wrong mixing and application. Poor drainage When the drainage system where the shower drain is located is poorly designed or if there is too much trash in the drain, water can enter between the shower pan and the drain, pool in the surrounding area, and damage the floor. Stone Tiles Stone tiles might gradually deteriorate your shower floors since they absorb large volumes of water like stiff sponges. When shower floors leak, you may search for temporary fixes or delay fixing them. You should decide to fix the leak permanently to save time and money in the long run. Common Signs of a Shower Floor Leak Don’t ignore leaks in your home. Leaks can lead to severe floor damages, and they can affect your bathroom structure. The common signs of leaks to look out for are: Grout or Sealing Problem The grout is broken or missing, or there is no silicone sealant on the joints connecting the walls and floors. Musky Odor If the water can’t dry or get out of the shower area, it can cause mould to grow on shower walls. You can even experience a musky, earthy odour, which usually indicates a leak. Water Stains There are damp patches on the bathroom floor along the walls or outside the shower, and there are water stains on carpets and other surfaces in nearby rooms or at the entrance to the bathroom. Watermarks on the ceiling under the shower indicate a serious leak, especially for bathrooms on the top floor. Check and caulk the shower drain, fill with water, and look for leaks below after 15 minutes. How to Detect the Source of the Leak? It is possible that the shower drain is leaking, but it is also possible that the shower floor is leaking if you notice a stain developing on the shower ceiling or if the flooring next to it is loose or damp. You can identify their exact location by performing the following tests: Spray Test: Apply water to the suspected leak spot and check for leaks after five minutes. Pressure Test: Have a plumber check the pressure in your pipes. Flood Test: Pour water onto the shower floor and block the drain. Keep checking out for leaks. Drain Leak Test: The area between the waste grate and the puddle flange may be the problem if there are no leaks during the flood test but they do during the spray test. How to Seal Leaking Shower Tiles in 6 Steps? So, what can you do about the leaks? We have, in this section, added a step-by-step guideline that you can follow to repair your leaking shower floor. 1. Gather Tools and Materials Shower plug to contain water temporarily. A grout scraper, sponge, caulking gun, and utility knife. Grout for filling gaps between tiles. Sponge and bucket for cleaning. High-quality silicone sealant such as Bostik Ultra Clear or Selleys Ultra to protect tiles and grout. Gloves and safety glasses to protect yourself. 2. Remove Old Grout You don’t need to replace all the tiles, but you do need to remove the old grout. Use a grout removal tool to scrape out old grout, and remove any cracked or loose tiles with a chisel and hammer without damaging the waterproofing membrane. Clean the area thoroughly with a sponge and water, then let it dry completely. 3. Apply a Waterproofing Membrane If waterproofing membrane is not present or damaged, use a new liquid waterproofing membrane with a brush or roller, coating the whole shower floor and going up the walls by a minimum of 150mm for a watertight seal. Dry to the manufacturer’s instructions, since more than one coat may be required. 4. Grouting and Sealing a Shower Use painter’s tape to tape edges to get clean lines. As directed, mix the grout and use a rubber float to spread it. Press firmly into the gaps to eliminate any air pockets. A moist sponge can be used to remove extra grout. 5. Seal Shower Floor Once the grout has set, which usually takes 24 to 48 hours, apply a shower tile sealer to create a water- and stain-resistant layer, especially where the shower floor meets the walls or drain. Apply a thin, even layer of silicone caulk to these spots, smoothing it with your finger or a caulking tool to seal shower floor. 6. Test the Repair You can follow some shower plug instructions to test the bathroom floor for any leakage. Do the following: Get a plug: Block the drain with a shower plug. Push-fit plugs are designed to fit over waste pipes, whereas rubber suction plugs are suitable for flat drains. Insert carefully: Press firmly until no more space is left. Look for leaks: Fill the shower base with a few inches of water, let it sit for 15-20 minutes, then check for any signs of leakage. If the floor remains dry, your repair was successful.
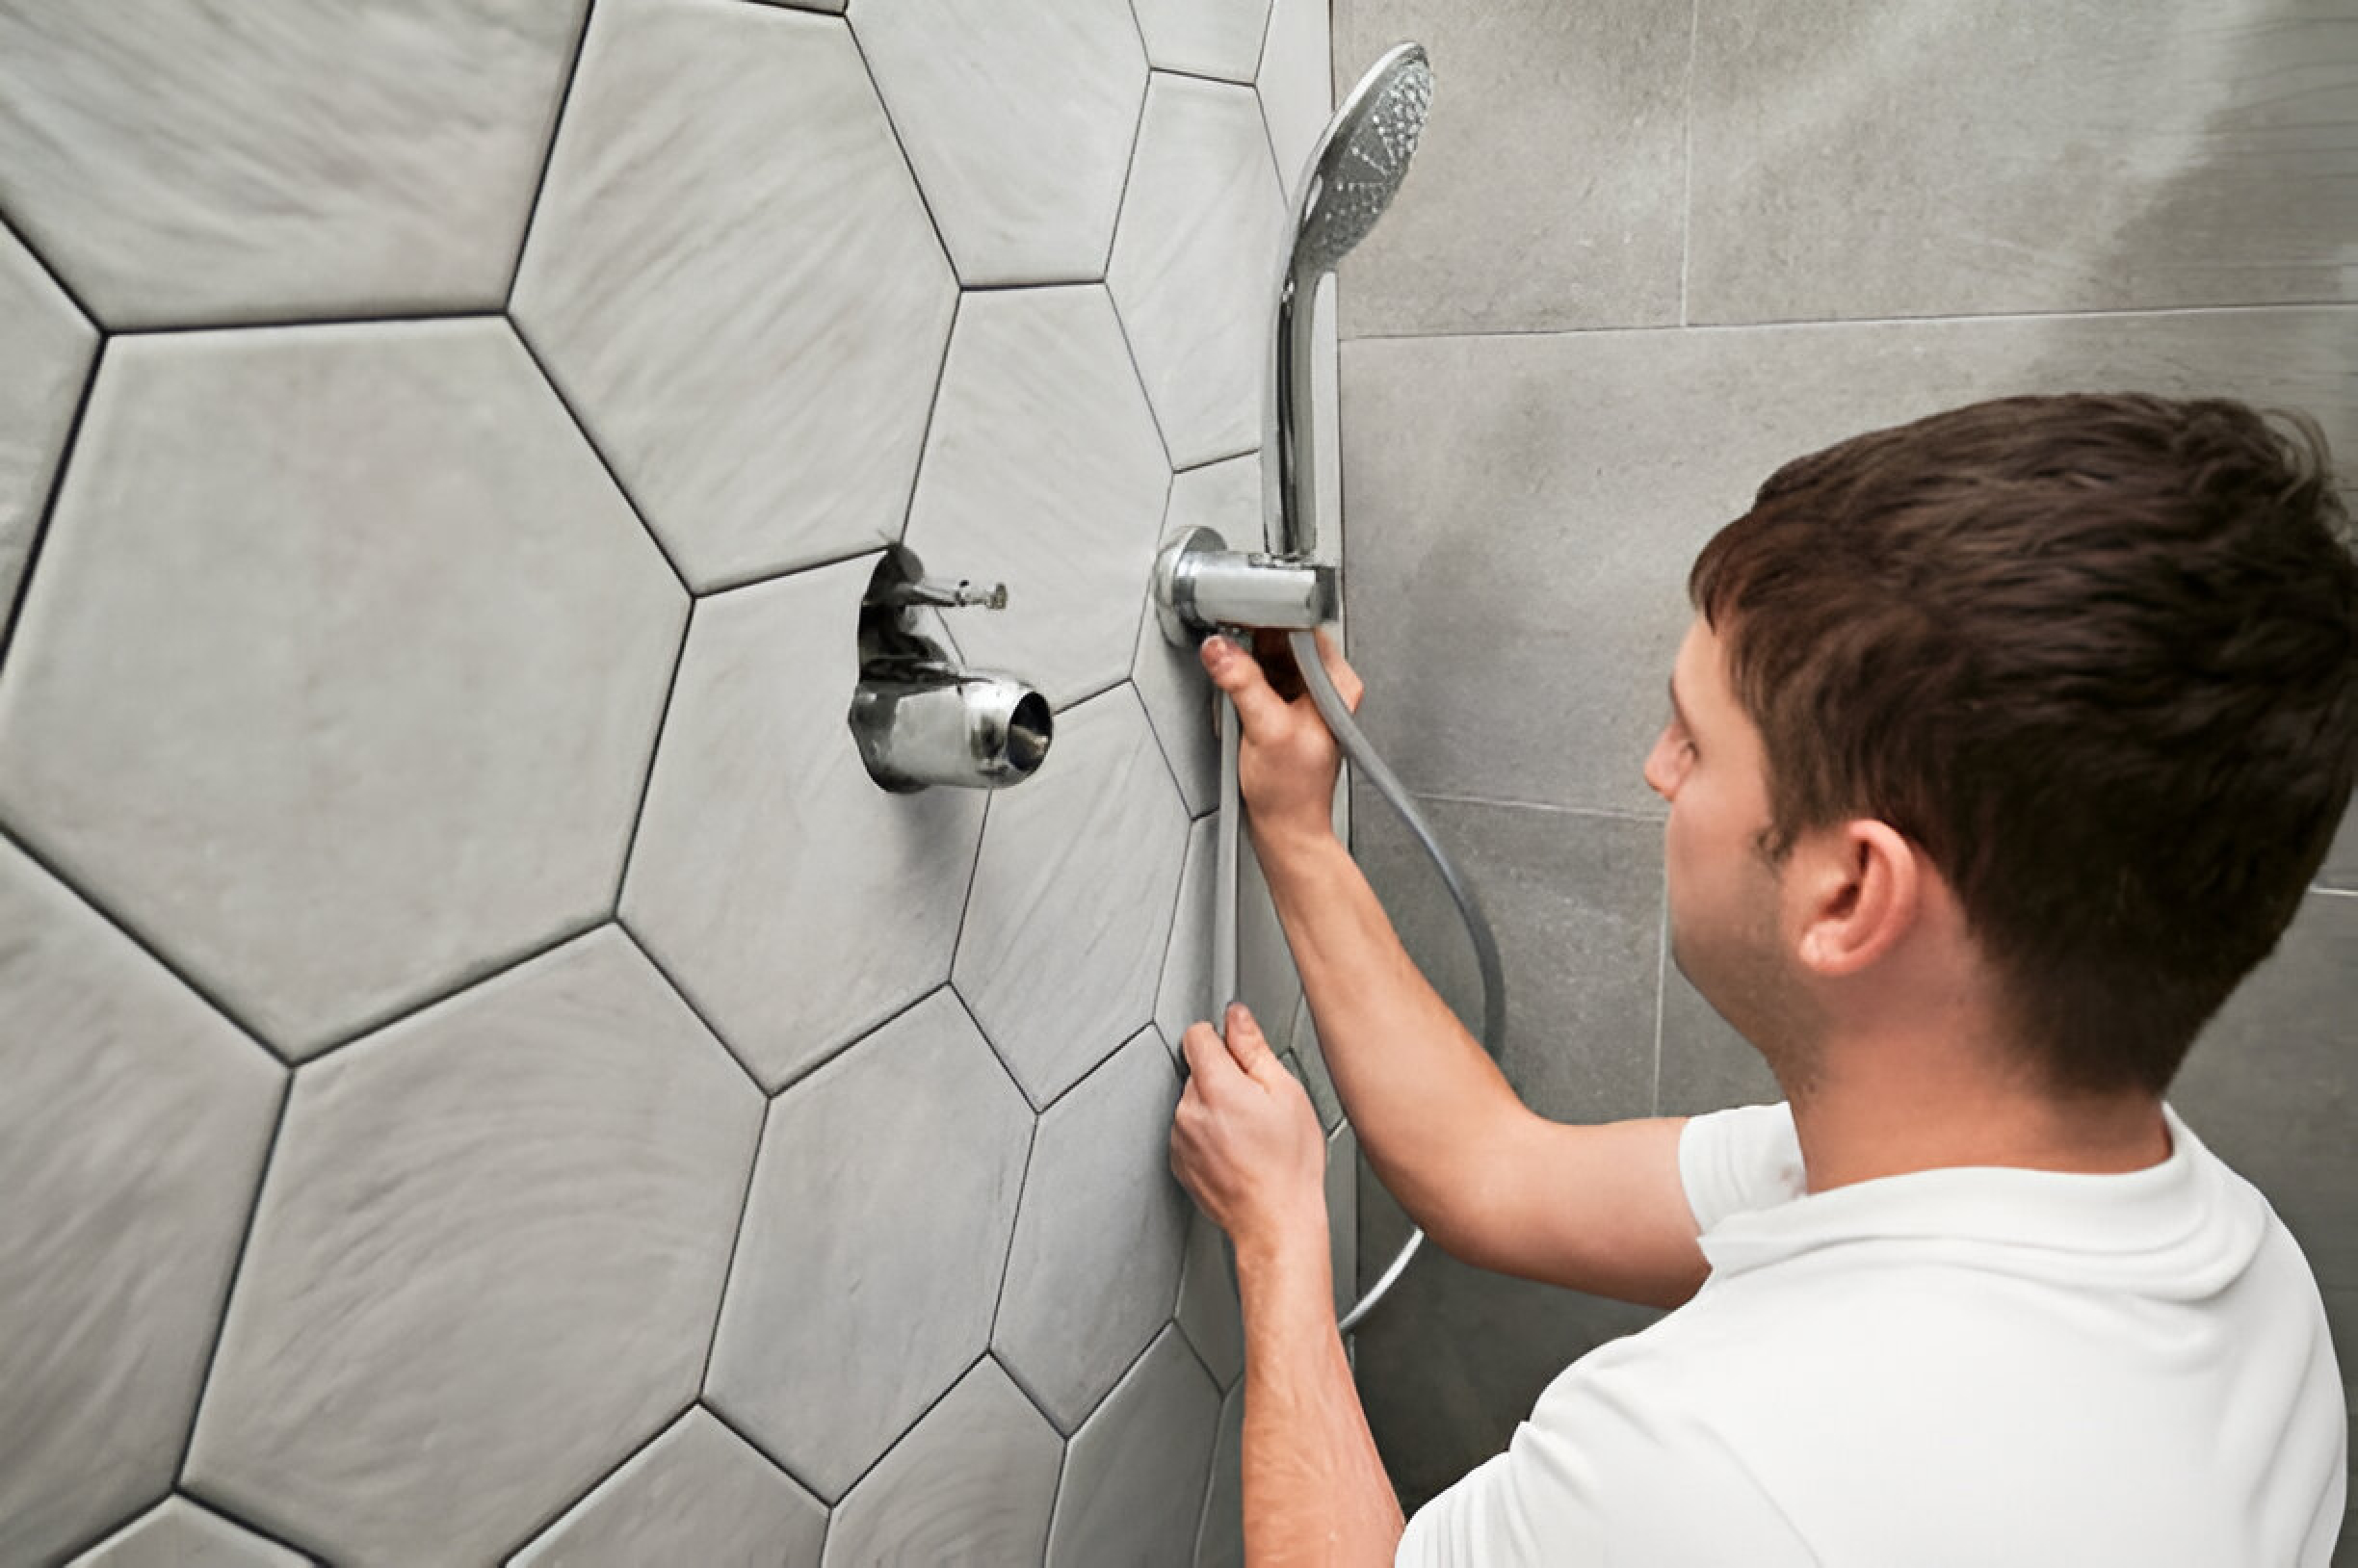
How To Fix A Dripping Showerhead?
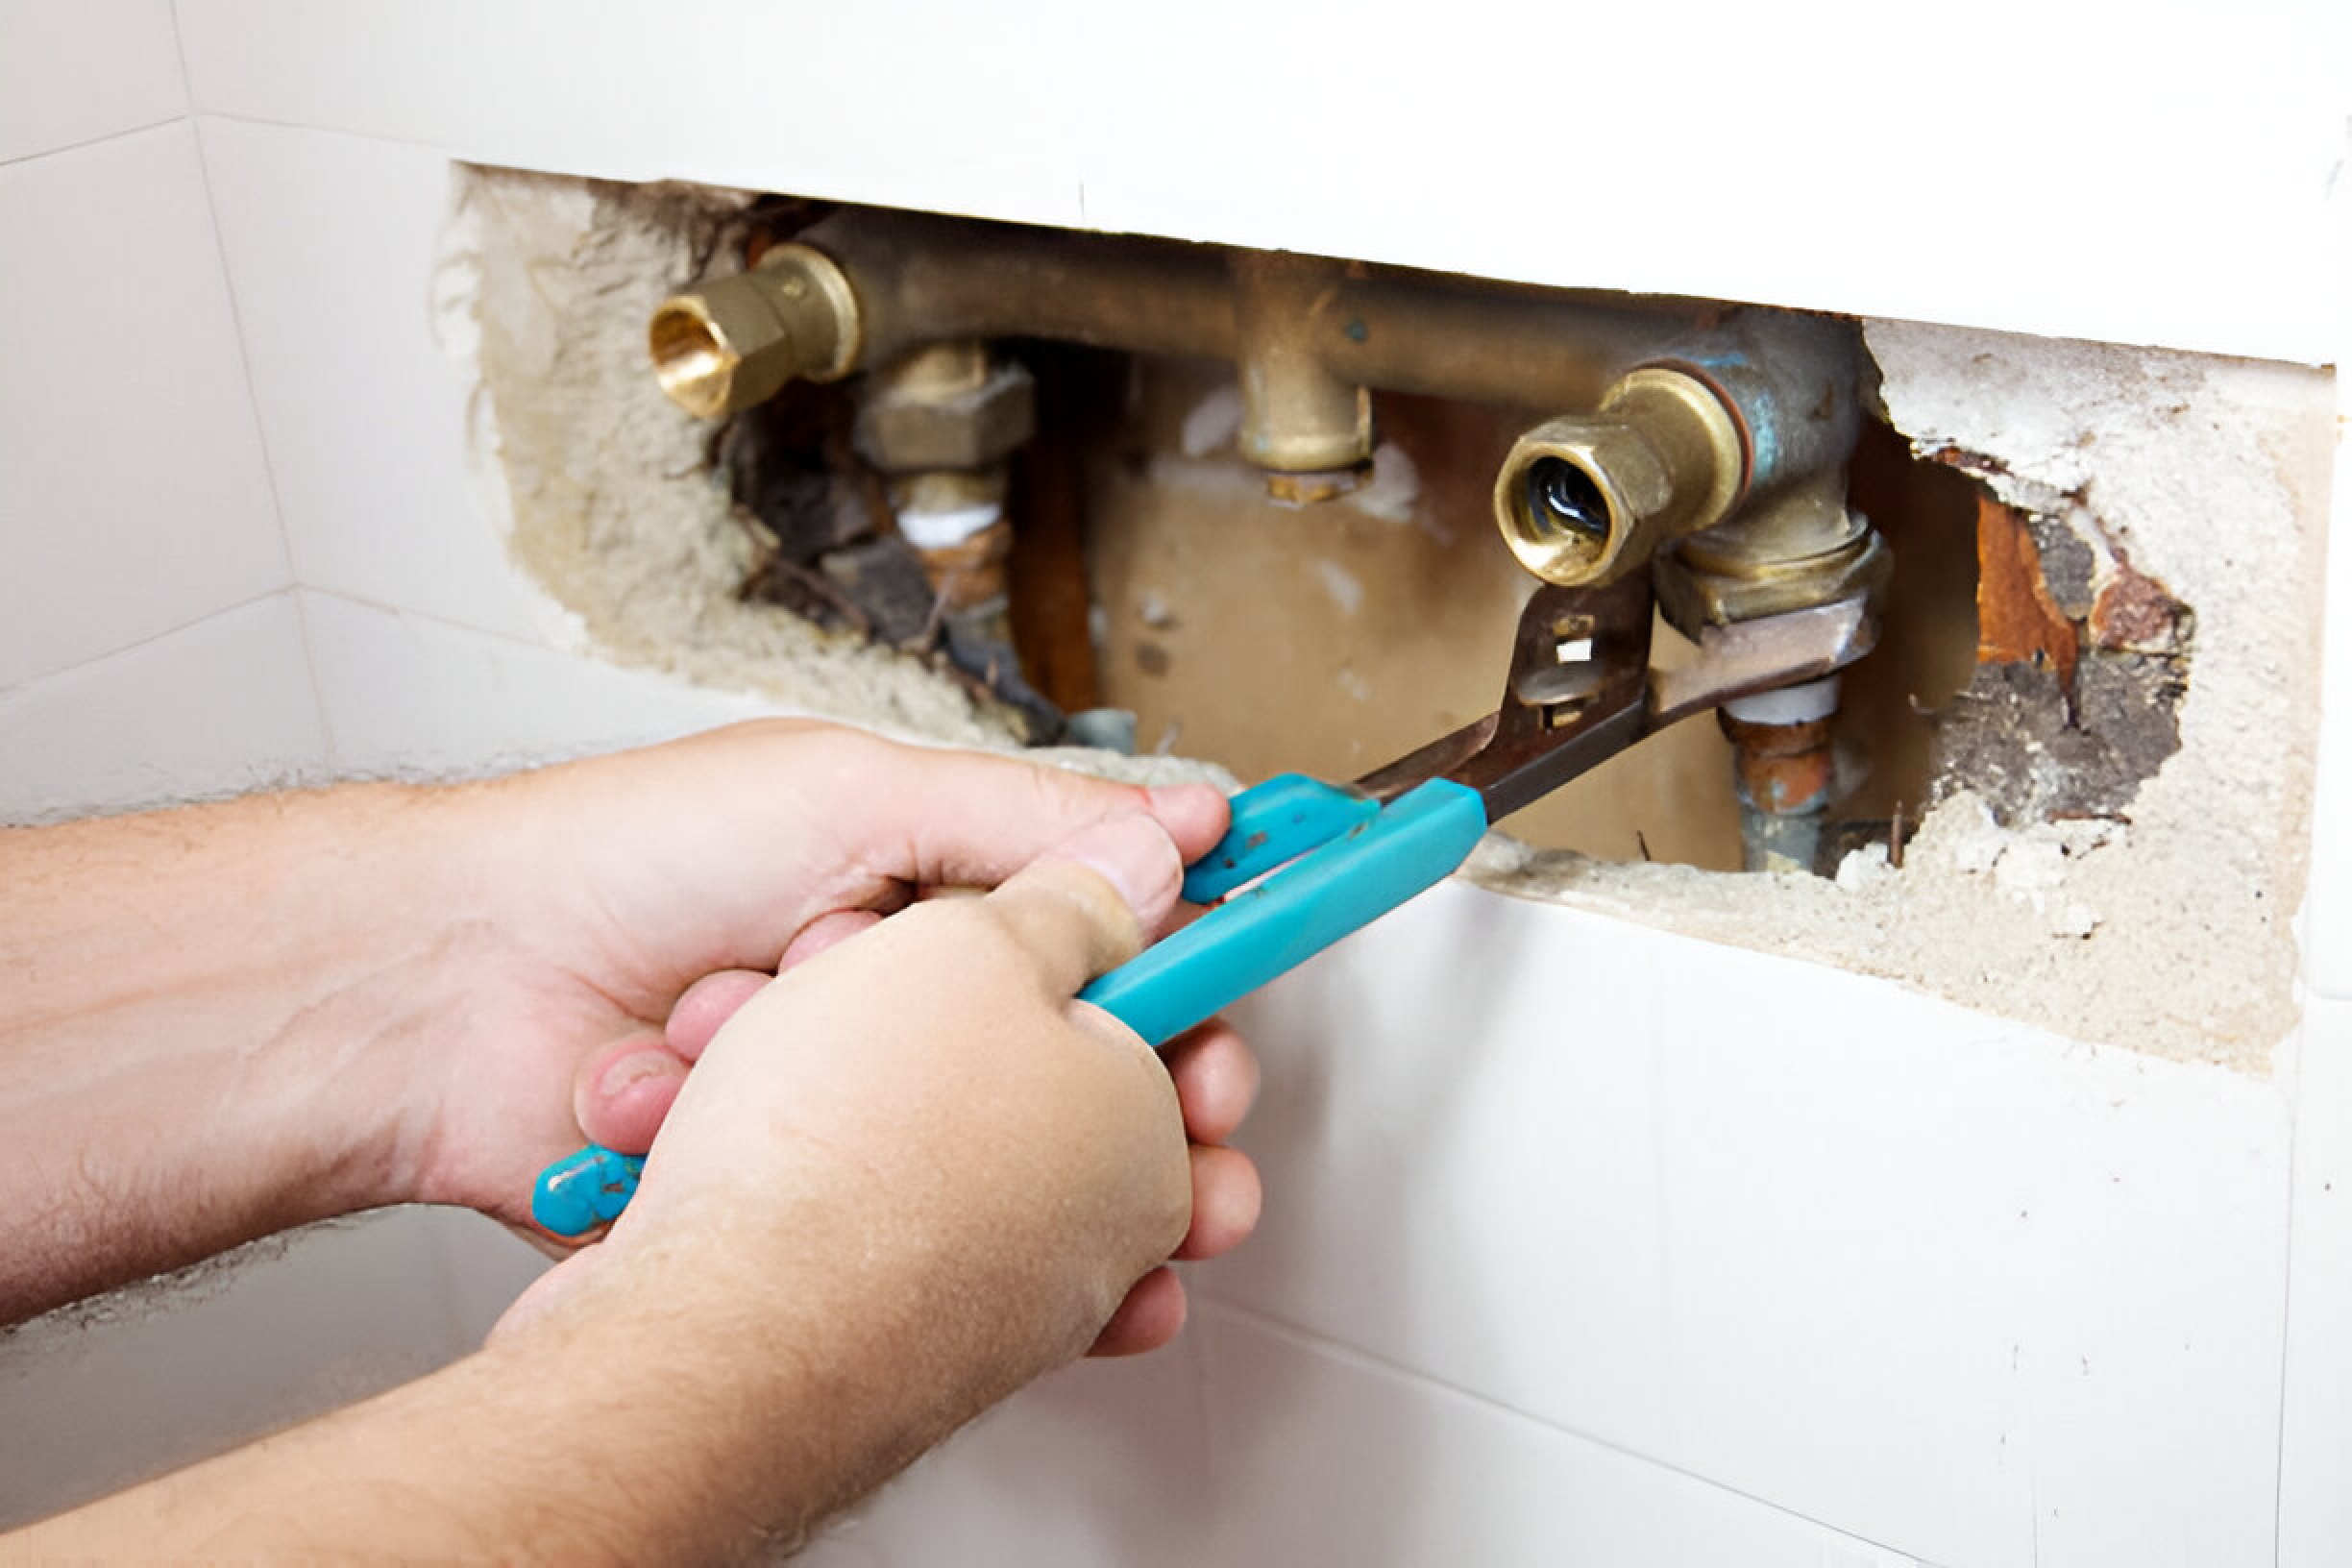
How To Fix A Dripping Showerhead? We all take baths to feel refreshed, but if you have a bad case of hearing your shower head leak in the bathroom, we understand you completely. The constant plink-plonk can interfere with your shower time, increase your water bill, and eventually cause water damage. Fortunately, we can tell you how to fix a dripping showerhead, which is a simple process that doesn’t always require professional assistance. In this guide, we will walk you through fixing dripping shower by identifying the common causes and tips to prevent it from happening again. So, what are you waiting for? Grab your tools and get ready to bid farewell to the drip. Common Leakage Points If leakage occurs when the water is running, the connections of the shower head are the problem. The following are typical locations for leaks: Fixed shower head at swivel or threads. Handheld shower head at the connector. Shower hose at connections. Shower head holder at swivel or threads. Identifying A Leaking Shower Head We need to go over some of the fundamental causes of leaks, and then we will discuss how to fix a dripping showerhead. We have made a list of possible reasons that make your showerhead drip: Washers/O-Rings: Leaks occur when rubber components in the showerhead or valve deteriorate. Mineral Buildup: Mineral deposits in hard water can clog or damage showerhead parts, leading to leaks. Seals: Water leakage can be caused by worn-out gaskets and seals. Shower Valve and Cartridge: If you are facing a dripping shower head when water is off, this isn’t a shower head issue; your shower cartridge in the valve is malfunctioning. The cartridge controls water flow, temperature, and pressure. When it fails, water can leak through its seal, causing dripping when the shower isn’t in use. Installation: Water leaks can result from loose or improperly installed components. Water Pressure: Excessive water pressure might strain shower components and cause leakage. What Tools Do You Need to Fix Leaky Shower Head? You need to gather these tools if you want to start fixing dripping shower: Adjustable wrench Screwdrivers: flat-head and Phillips Teflon tape Washers or O-rings for replacement Vinegar and a brush Bucket How to Repair Dripping Shower Head in 8 Easy Steps? Turn Off Water Supply Turn off the water supply (shower’s valve or the main water valve) before disassembling anything to avoid water spraying as you work. After that, turn the shower faucet on to clear the pipes of any leftover water. Take Out the Old Shower Head If the shower head is stuck on the shower arm, use an adjustable or set of pliers, even if you can free it with your hands. The wrench can be protected by wrapping it in a cloth. Cover the fitting with a cloth to keep the finish from getting scratched. Check the interior of the shower head for signs of wear or damage, and put it in a bucket. Check and Clean the Shower Head Look for rust, mineral deposits, or other damage on the showerhead. We advise soaking your shower head in a solution of white vinegar and water for 30 to 60 minutes, followed by a water rinse, to remove any buildup on the surface and in the nozzles. Use a toothbrush or soft brush to scrub the threads and nozzles to get rid of any leftover residue. Reattach the showerhead to the arm after giving it a quick rinse with water. You will need to purchase a new shower head or accessory if the threads or any part of the shower head, hose, or holder are cracked, split, or otherwise damaged. Clean The Shower Arm You should remove the old and worn thread seal tape that is usually placed around the shower arm. Use a cloth and warm, soapy water to clean it. You should replace the shower arm if it is corroded or damaged. Check the Washers and O-Rings Rubber parts known as washers or O-rings are among the most frequent sources of leaks in leaky showerheads. Any shower head washers that are located inside the head or accessory should be removed. A paper clip or a small flathead screwdriver can be used to remove the shower head washers. Be sure to remove any loose thread seal tape or dirt. Replace Shower Head Washers If the washers and O-rings appear cracked, brittle, or worn out, replace them with new ones. These should cost a dollar or two per package at a local hardware store, and they are a universal fit of your standard showerhead, hose, or holder bracket size. Apply a small amount of plumber’s grease to the new washer for a better seal. Put Plumber’s Tape Wrap Teflon tape around the threads of the hand-held showerhead arm clockwise four or five times to create a watertight seal if the leak comes from the connection between the showerhead and the arm. Apply pressure to the thread seal tape using your fingertips. Reinstall Shower Head & Test Attach the showerhead back to the pipe and use the wrench to secure it, but don’t overtighten. Turn the water supply back on and test the showerhead for leaks. Check for any leaks around the threads or nozzles. If you have followed the steps correctly, the dripping should be resolved. What Should You Do If the Dripping Persists? The shower valve can be the problem if the dripping persists. Take these steps to repair it: Access the valve by removing the escutcheon plate and faucet handle. The cartridge found in the majority of contemporary showers should be replaced with a compatible part if it is worn out or broken. After replacing the parts, firmly reattach them. A professional plumber may be needed for valve repairs, so don’t be reluctant to call one. Tips for Preventing a Dripping Showerhead You can follow the following tips to keep your showerhead in working condition: Keep it clean to prevent mineral accumulation. Check and swap out O-rings and washers as
7 Common Causes of Leaking Showers
7 Common Causes of Leaking Showers A leaking shower is among the most significant challenges that property owners face in Australia. Water leaks in your showers can be from grout chips from tiles, weakening of waterproofing membrane, and gaps at wall and floor joints that can significantly raise your bills and damage. All these contribute to raising the chances of water seepage through. Here are the 7 common causes of leaking showers and the remedial solutions, so that you can try to rectify them all without calling in bathroom renovation experts. Even when you hire a waterproofing specialist, you might still find out where the problem is, and you might save your pocket. We are here to help you resolve such issues in no time so you wouldn’t waste time, money, and frustration. Causes of Leaking Showers This section identifies typical causes with solutions to leaks that do not require bathrooms to be completely renovated. Cracked Tile Grout Tile grout is a porous paste or material that fills gaps and cracks between the shower tiles. Grout crumbles, chips, and rots from constant exposure of water and cleaning products to it. That means there is seepage behind, causing leaks. Spray water droplets onto one wall of the shower, working along the grout lines. As you spray the water, observe the leaks. Carefully check your grout lines closely both before and after getting them wet. Look for gaps in the grout or what might look like holes. What Can You Do to Fix It? The grout should be checked regularly to see if it has cracks or gaps. Apply the grout remover to loose or damaged grout and remove. Clean the area completely and apply a new layer of grout. It should be allowed to dry before using the shower. Substrate Problems This is the foundation beneath your shower tiles. It leaks whenever this substrate is not installed right, has damages, or is incompatible with the waterproofing system. Substrate problems usually result in full renovation, like the removal of tiles and waterproofing layers. What Can You Do to Fix It? The substrate problems necessitate complete rebuilds in your shower area. This is one of the most complex projects that only a qualified contractor can handle. Faulty Shower Faucet Leaky shower faucets are one of the most common causes of leaky showers. A leaking faucet may seem minor, but it can lead to significant water waste and increase your water bill. Over time, shower faucets start to deteriorate due to constant use. O-ring cartridges may deteriorate and fail to restrict the flow of water. Hard mineral deposits can cause parts inside to rust and stick together. Turn off the faucet by unscrewing it with an adjustable wrench to check the problem. What Can You Do to Fix It? Remove the showerhead or faucet and inspect the inner parts for wear or damage. Replace the worn or damaged parts or install a new faucet. Seek professional help from a plumber if the issue continues. Tiles Need Resealing Even if the grout is fine, the tiles themselves may lose their water resistance. A porous tile or a microcracked tile absorbs moisture, allowing leaks to form. Tiles in high-moisture areas, such as a shower, will eventually lose their seal, allowing moisture to penetrate the substrates and cause leaks. Regular resealing of the tiles prevents moisture infiltration and preserves both the tiles and the substrates beneath them. What Can You Do to Fix It? Set them with similar tiles and seal them with grout. They should be sealed with a high-quality tile sealer every few years to keep them water-resistant. Leaking Drains As each shower drain has a P-trap, debris cannot build deep inside the plumbing and make its way back out. A clogged or damaged drain can cause water to accumulate in your shower and possibly seep into other areas. Eventually, this can cause leaks in the surrounding floor or walls. Hair, soap scum, and debris can build up in your drain over time, causing blockages or slow drainage. There could be leaks due to a damaged or cracked drain pipe. If you suspect there is a problem with your drainage or plumbing system, seek the expert. What Can You Do to Fix It? Keep the shower drain clean to remove any scum or muck that accumulates over time and causes a clog. This type of clog must be cleared with a drain snake or plumber’s auger. This clog can also be removed by cleaning drains with baking soda and vinegar. Waterproofing Failure Damp areas of a building are legally required to have waterproofing membranes, which is the first line of defence against shower leaks. The membranes that are at the bottom of the tiles prevent water from accessing the subfloor and walls. If we dig deeper, we find that most of the waterproofing failures are caused by time pressures that force the workers to compromise proper surface preparation for an airtight seal. When a surface becomes damaged or warped, it should be replaced with a membrane. This could leave you without a shower for several days as the process to remove and reinstall the tiles takes time. What Can You Do to Fix It? If damage or a missing waterproof membrane is found, it requires immediate action, like removing some shower tiles to install a new membrane. A professional property maintenance service can assess the situation and suggest the best possible action. Silicone Degradation The silicone prevents water from penetrating to the joints between the wall and floor. It goes without saying that silicone used around the shower edges is prone to deterioration. It may eventually flake off or lose functionality, allowing water to leak out again. Unlike tile grout, silicone can withstand stresses caused by foundation movement and building shaking. However, if they are frequently exposed to damp conditions, they will become loose, cracked, or mouldy. What Can You Do to Fix It? Remove the old silicone strip. Clean the area thoroughly, apply a
5 Ways to Stop Your Shower Leaking
5 Ways to Stop Your Shower Leaking Do you agree that there is nothing worse than discovering a puddle on the floor after taking a relaxing shower? A leaking shower is more than just an inconvenience; it can cause water damage, mould growth, health risks, and higher utility bills. These challenges must be addressed on a proactive basis. In this blog, we will discuss 5 ways to stop your shower leaking while keeping your bathroom functional and damage-free. Signs You Have a Leaking Shower You need to look out for these signs of a leaking shower to avoid water damage: A foul smell in your bathroom may be a case of blocked drains or extreme mould. Movement of tiles inside the shower is a sign of there being trapped water under it. Cracked or broken ones let in more water. Peeling paint from poor ventilation or water damage around the shower area. Do not repair this by painting over it; instead, find the source of the problem. If there is grout missing/loose in the shower area, seal this off as soon as possible before the water works its way underneath the tiles. Discoloration of the grout is an absolute sign of leakage. Jamming of the door of a shower signifies that behind a wall, because of a leak in a shower, there is considerable moisture within a wall. The deformation of a wall and its stains indicate there is water damage behind. Can You Repair a Leaking Shower Yourself? Even when used appropriately, most retail goods only offer temporary relief. Typically, only visible gaps in grout or between tiles are sealed, and other leaks can go overlooked. Furthermore, after all of your hard work, silicone-based materials tend to grow mould quickly and may not withstand building movement. Ez Shower Repair and Tiling is the industry leader, with the most experienced specialists managing a number of projects nationwide while maintaining the highest quality. Effective Methods to Repair a Leaking Shower We have listed below some of the methods that you can use to repair your shower leak: Fix the Showerhead A malfunctioning showerhead is one of the main reasons for leaks due to the worn-out washer or a loose connection. Common Signs Water dripping from the shower head even if the valve is off. There is a loose connection between the shower head and hose. Solution It may just require tightening. An adjustable wrench, a bit tightened but with care for it will damage, can solve this issue. You can replace the washers, as it is just another source of leak when worn washers exist. These are easily available and cheap. Materials/Tools Replacement washers. Get the ones compatible with your showerhead. Adjustable wrench and pliers Procedure Turn off the water supply for the shower. Unscrew the showerhead with the wrench; pliers may be needed to hold the arm steady. Remove the old washers and replace with new ones. Reassemble the showerhead and hand-tighten the connection. Fix the Faucet When internal components, such as the valve seats or cartridge, wear down and let water come out of it, you will get a leaky faucet. Common Signs Water continues to drip from the handle in a full-closed position. Solution Change the faucet cartridge. The job is complex but doable. Materials/Tools Replacement faucet cartridge—Specific to your faucet type Adjustable wrench and Allen wrench Screwdriver—flathead or Phillips Procedure Turn off the water supply for the shower. Remove the handle. The cartridge is exposed when a concealed screw or decorative cap is removed from the majority of handles. Use the wrench to replace the old cartridge with a new one, ensuring that it is correctly placed and tightened according to the instructions. Reattach the faucet handle and switch on the water supply to check for leaks. Replace Broken Tiles If you have cracked tiles in your shower area, they can often allow water to seep through, causing leaks behind the wall. Common Signs There are some prominent cracks or chips in the tiles. You can see discoloration or mould around the grout lines. Solution You can replace broken tile to fix this problem. Materials/Tools Safety glasses Hammer and chisel, or grout removal tool Putty knife Tile adhesive for wet areas Replacement tile, matching the existing one Grout, matching the existing Grout float and sponge Procedure Put on protective gear. Use a hammer and chisel or grout removal tool to carefully remove the damaged tile without damaging the surrounding tiles. Clean off debris from the area. Apply tile adhesive to the back of the replacement tile and press into place, making sure spacers are in place for even spacing. Let the adhesive cure with directions given by the manufacturer. Re-Grout the Tiles You can see that grout seals up the water passage between the tiles against infiltration. Over the passage of time, it can start showing crack, crumbles, and spots Common Signs The grout is cracked, crumbling, or missing. It has become dirty or discoloured. Solution Your shower area needs re-grouting of tiles to renew the way they look and prevent water damage. Materials/Tools Safety glasses and rubber gloves Grout removal tool and grout float Wet sponge Grout cleaner and grout sealer Procedure Turn off the water supply to the shower. Use a grout removal tool to carefully scrape away the old grout without damaging the tiles. Clean the area between the tiles to remove dust and debris from it. Press the grout into the grout lines with a grout float, working in small sections at a time. Hold the float at a 45-degree angle and press the grout into the joints. Wipe off excess grout from the surfaces of the tiles with a damp sponge before it dries. When fully dried, apply a grout sealer to protect the area against water damage and stains. Hire Shower Sealed to Fix Your Leaking Shower Temporary solutions can work for common shower leaks; some repairs do require professional help. The signs that you need to contact a professional